Page 2 of 4
Re: Ski Twin 33
Posted: Thu Jun 13, 2013 10:37 pm
by water_buoy
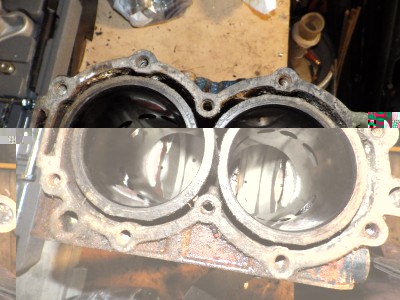
I've got most block stripped down now and this is how it's currently looking

Good ol' tesco freezer bags!
I'm thinking about running a glaze breaker over the bore and fitting some new piston rings as its got quite a shine to it, but no scores from what I can see.

- Bore
I haven't gone this far on a rebuild before though and I don't know much about it so if anyone has any advice, doo's or don'ts for what should be done at this stage I'd be greatfull.
The next job is to start sandblasting most of the parts individually before re paint so it will probably be a while before this gets built back up anyway.
Re: Ski Twin 33
Posted: Thu Jun 13, 2013 10:44 pm
by haventaclue
You have it this far,I agree with a hone and new rings.Would also suggest new seals and bearings.
Re: Ski Twin 33
Posted: Thu Jun 13, 2013 10:48 pm
by Alacrity
I agree with Haventaclue, if you can run to it, vapour blasting is less damaging & is less risky with grit contamination afterwards.
Re: Ski Twin 33
Posted: Thu Jun 13, 2013 11:13 pm
by floater
Good work, often the worst and most dangerous part is dismantling so to have it all in bits without breakage is no mean feat.
Worth a gentle hone to break the glaze, will help to bed new rings in too. If possible measure the bore before you invest in rings just to be sure it's within limits. There will likely be some ovality but also check around TDC which tends to "bulge"
Bottom (graphite) crank seal is worth doing but only available from the US. My gut would say leave the crank and con rods alone if all seems well although you will be really peeved if you get it all back together and it sounds like a bag of marbles so up to you.
If you have a flat plate it would be worth rubbing the head gasket faces across some wet and dry on it. It doesn't seem to need much of a hollow or nick to cause the gasket to blow as the bolts aren't torqued very highly.
Look forward to seeing it on the boat and the boat on the plane

Re: Ski Twin 33
Posted: Fri Jun 14, 2013 10:05 am
by Rapier
I have a new head gasket you can have for a small donation to club funds? Will bring it to the I&S run if Ok.
Mike at South Coast Marine will have the carbon seal, but most of the other gubbins that holds it in place is NLA.
Re: Ski Twin 33
Posted: Fri Jun 14, 2013 10:32 pm
by water_buoy
Thanks all, a hone and new rings it is then! The crank/conrod bearings seemed pretty good so I think I'll leave them alone unless I happen to come across a set sometime.
Alacrity wrote:I agree with Haventaclue, if you can run to it, vapour blasting is less damaging & is less risky with grit contamination afterwards.
I've not heard of vapour blasting before, is that something I would have to get done professionally? I was thinking of sandblasting because its relatively cheap (not got much of a budget) as I can set up to do it in my shed.
Rapier wrote:I have a new head gasket you can have for a small donation to club funds? Will bring it to the I&S run if Ok.
Head gasket would be brilliant thanks

that would be perfect if you could bring it to I&S

I've got a nice piece of flat slate standing by for flatting down the head and any other surfaces that need it.
Re: Ski Twin 33
Posted: Sun Jun 16, 2013 8:55 am
by Rapier
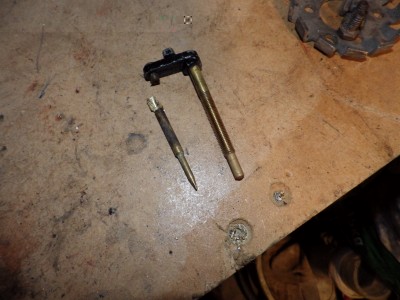
My manuals weren't specific about the low and high speed needle setup for my Ski Twin 40, so I checked with Mike's '70 manual for the 33hp and they're the same as the 40 - 3/8 for high and 1&1/4 for low. Was your 33's high speed needle blunt too, i.e. not tapered to a point?
Re: Ski Twin 33
Posted: Sun Jun 16, 2013 1:49 pm
by water_buoy
Yeah the high speed one is fairly blunt, this is what they both look like (remains of the low speed one)

- Needles
I've got a 1968 manual for a 33 and that ties in with what you said as well, 3/8 for the high speed and 1-1/4 for low speed.
Re: Ski Twin 33
Posted: Mon Jul 01, 2013 8:51 pm
by water_buoy
I've started with the sandblasting and with my mocked up cabinet in the shed and things are going well.
Before I move on to painting I think I need to address the few broken studs that I have in the block though. I'm planning to try and drill and tap these but I'm not sure what thread they are and wandered if anyone could enlighten me? The ones that are mostly broken were between the power head and the lower unit, I think they are number 84 in this drawing
http://www.marineengine.com/parts/johns ... Unit+Group but I have no idea about imperial threads

Also would it be a good idea to replace these with stainless this time around or is that asking for trouble in an ally block?
Cheers
Re: Ski Twin 33
Posted: Mon Jul 01, 2013 9:38 pm
by floater
Before you drill out and try to re tap the hole give it a good flood of plus gas and try a screw extractor (
http://www.amazon.co.uk/Draper-Expert-4 ... _sbs_diy_1) if you miss with the drill you will probably need to Repair the thread with an insert
http://www.afsrecoil.net/
The thread is either 1/4"-20 UNC or 5/16"-18 UNC the 18 and 20 refer to the thread pitch, in this instance this is the number of thread peaks per inch of thread. UNC is The acronym for Unified coarse thread as opposed to UNF unified fine, both are common on American products.
I replaced most of the bolts on my motor with stainless to save myself grief in the future. You may need some reduced head bolts for your motor as a standard head may be too big for some of the positions if these prove difficult to obtain you could go for hex cap head which have a smaller head than hex bolts.
I have used copper slip in the past to prevent bolts seizing but on advice from our firms corrosion expert have switched to a graphite based product as copper and aluminium react badly together in galvanic corrosion terms.
 Good ol' tesco freezer bags!